
By LyNae Golder
Do you want to schedule an appointment at the University Writing Center (UWC), but don’t know how? You’re in the perfect spot to find out.
At the UWC, our undergraduate, graduate, and faculty consultants provide a space that allows writers to discuss their writing and grow in their writing practices. Our role as consultants is to listen carefully to the concerns of the writer and to assist them with achieving their ultimate vision for their work. Whether you’re an undergraduate, a graduate, or a faculty member, we are here for you.
Scheduled appointments begin at the top of the hour and conclude fifteen minutes before the end of the hour. Walk-in appointments are accepted after the hour has started, but they are subject to consultant availability and will still conclude fifteen minutes before the end of the hour. During high-volume times such as midterms and finals week, we strongly suggest that writers schedule in advance to ensure they are receiving the time they need for their appointments.
Whether you want to secure an appointment by walking in or scheduling for a future date, we require every writer to make an account on our scheduling platform via WC Online. WC Online allows writers to schedule with ease and allows us to document each appointment. WC Online can be accessed through our University Writing Center Homepage (http://liberalarts.indianapolis.iu.edu/uwc/) or directly at http://iupui.mywconline.com. Once you’ve made it to our UWC scheduling platform (pictured below), you may begin the steps to creating an account.
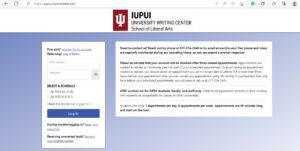
Step 1: Register for an account.
The registration page can be found by clicking on the hyperlink listed after the question “First visit?” above the login boxes. Once you’ve clicked the link, you’ll be shown a form of questions with required answers, starting with your first and last name (pictured below with example text).
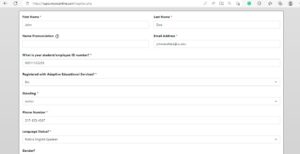
Once you’ve registered correctly, you’ll be taken back to the home page of the scheduling platform.
Step 2: Login to your account.
Now that you’ve registered, you should see a green box that states that your account has been created successfully above the login box (pictured below).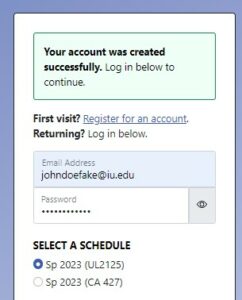
Login with the same information you registered with and select one of the two schedules (for the University Library or Cavanaugh Hall). Do not login with the information for your official IU account. It will not work.
Step 3: Schedule an appointment with Appointment Search.
When you’ve logged in, you’ll be taken to the Appointment Search page (pictured below). This is one of two ways to schedule and view appointments. On the left side lies the “Find an Appointment” tool. On the right, under “Today’s Appointments,” you’ll see any same-day appointments as well as appointments that have been scheduled for future dates. 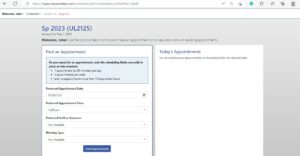
Step 4: Search for an available appointment.
Through the “Find an Appointment” tool, you must use the drop-down menus to select a date, time, staff resource, and whether the appointment is in-person, which would take place in one of the two center locations, or online, which would take place via Zoom. Once the search is completed, your choices will be shown to you.
For example, if you wanted an appointment on Monday, March 20, 2023, at 3 pm with any staff resource for any meeting type, you would receive search results that looked like this (pictured below). 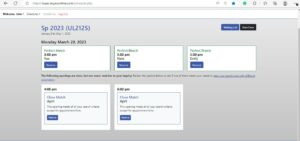
Step 5: Select an available slot.
Take a look at your choices. In this case, there are three perfect matches, Yue, Nate, and Emily, and two close matches with April. If you choose to schedule with one of the consultants, such as Nate, you will click “Reserve” and an appointment box will pop up (pictured below). Note that when the appointment box pops up, a short consultant biography appears. Feel free to browse through each of them to see if there’s a consultant that would fit your needs best, though each of us has the same training.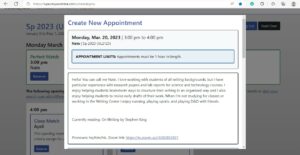
Step 6: Enter required Appointment Details.
Once the appointment box pops up, you will need to enter the necessary details for your appointment (pictured below). The required information includes your school, department, course level, the stage of the writing process, the area of focus, and whether the appointment is for a group project. Note that there will be four different stages of the writing process to choose from: 1) planning/brainstorming, 2) drafting, 3) revising, and 4) polishing/editing. 
Select “planning/brainstorming” if you don’t have much written but would like to discuss ways to develop your ideas. Select “drafting” if you’ve begun writing and need assistance moving forward. Select “revising” if you have a draft that is close to finished and in need of revision. Select “polishing/editing” if you have a draft that’s finished but needs to be fine-tuned to submission or publication.
When you are finished entering those details, click “Create Appointment.”
Step 7: Schedule an appointment with the Calendar Display.
While the Appointment Search page is an effective way to schedule, it is not the only way. If you’d like to view the entire calendar of appointments, pay attention to the “Find an Appointment” tool. At the bottom of the toolbox, there is a hyperlink to view the calendar display. Once you click the hyperlink, your page will refresh and show the Calendar Display (pictured below).
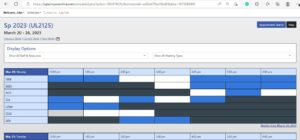
Note that with Calendar Display, appointments are organized by day and then by hour. Gray boxes denote timeslots that have already passed, blue boxes denote timeslots with scheduled appointments, and white boxes denote open timeslots.
Step 8: Select an available slot.
Select one of the white boxes for the timeslot that works best for you. Once you click on one of the boxes, such as Nate’s open 3 pm timeslot, an appointment box will pop up (pictured below).
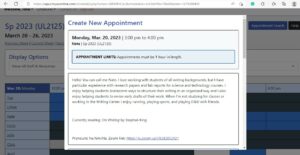
Step 9: Enter required Appointment Details.
Once the appointment box pops up, you will need to enter the necessary details for your appointment (pictured below). The required information includes your school, department, course level, the stage of the writing process, the area of focus, and whether the appointment is for a group project. When you are finished entering those details, click “Create Appointment.” 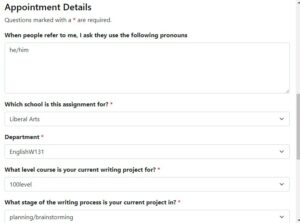
When the appointment has been made successfully, the page will refresh. You’ll be returned to Calendar Display. Your new appointment will show on the calendar as an orange box, which denotes the timeslot as yours (pictured below).

Step 10: Attend your appointment.
Whether you choose to schedule from the Appointment Search or Calendar Display, your appointment will be shared with our consultants. If you scheduled an in-person appointment, you’ll want to be at the UWC location you selected at the time of your appointment. If you scheduled an online appointment, you’ll want to join the consultant’s Zoom room five to ten minutes prior to your selected time. If you need to modify or cancel your appointment, you can do so from WC Online, email us at uwc@iu.edu, or give us a call at 317-274-2049.
Do you feel confident about scheduling an appointment now? Head over to http://iupui.mywconline.com and give it a try!